Scaling sprites
The Mega Drive can't do scaling in hardware, and the CPU is too slow to do it in software at a good framerate. This means that if you want to make sprites that get larger or smaller while keeping full speed you're going to need to cheat.
First let's take a look at what has been done before to understand what we're going to do.
Existing approaches
The most common approach was to have multiple versions of the sprite at different sizes, and then pick the closest one to what you need to show at the moment. It's the simplest approach, but there's a limit to how many steps you can fit in memory, and often the jumps between steps are too obvious and looks ugly.

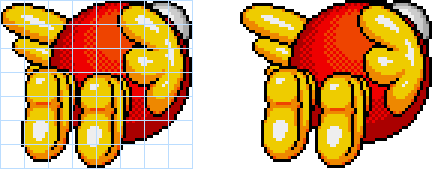
A more interesting approach is what Yū Yū Hakusho Makyō Tōitsusen does: sprites are split into smaller "slices", which then are pulled in closer to make it seem as if the sprite is shrinking. It's smooth, but it only looks OK when the sprite size doesn't change much.
Putting it together
Miniplanets takes the approaches above to their logical conclusion in its stage title cards (where this sprite was taken from!). Like the first approach, it has multiple versions of the sprite for the coarse steps, but then uses the second approach to smooth out the transition between them. This allows scaling to about any size while staying smooth.
